 Setup Wizard
The account wizard is designed to allow new users to easily set up and use myJabber along with their favorite chat Gateways. Designed to be intuitive and easy to use for the first timer, it should also be a very handy tool for the experienced myJabber user. In this how-to we are going to address the creation of a NEW account.
Figure 1 The Account Wizard's Welcome
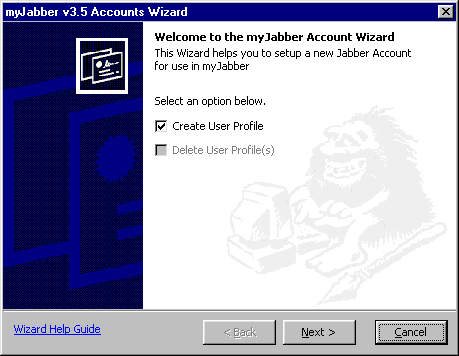
 The account wizard's Welcome screen, this screen has a couple
of profile options that will interest you. You can create a new account or edit your
existing profile. Choose Create User Profile or Choose Edit User Profile for editing
your existing profiles.
The account wizard's Welcome screen, this screen has a couple
of profile options that will interest you. You can create a new account or edit your
existing profile. Choose Create User Profile or Choose Edit User Profile for editing
your existing profiles.
Click
![]() to continue.
to continue.
Figure 2, the New Accounts screen
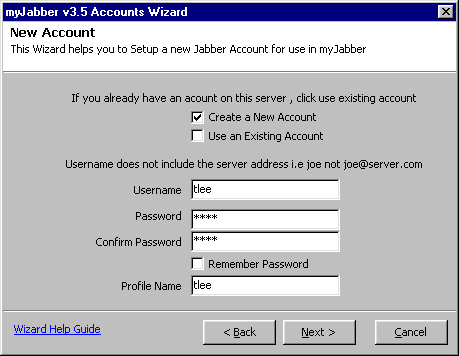
![]() We have arrived at the "New Account" screen where you are
presented with the options of working with your existing account or the opportunity to
create a new one. Remember, you can have more than one profile for each of your
myJabber accounts. You can click
We have arrived at the "New Account" screen where you are
presented with the options of working with your existing account or the opportunity to
create a new one. Remember, you can have more than one profile for each of your
myJabber accounts. You can click
![]() to go back a step to redo or change any information, any time during setup.
to go back a step to redo or change any information, any time during setup.
Note: "Create a New account" should be used when you do not have an account on the server of your choice. "Use an Existing Account" is to be used if you already have an account on your favorite server and you only wish to set up myJabber from a new location or you are using a new version. These send different signals to the server and could cause an error if selected incorrectly.
Choose "Create a New Account" and enter your new account information.
|
|
User Name: Is the name you wish to contacted by in the search or used to contact you the. i.e. joe Not: joe@server.com |
|
|
Password: Use a password you are familiar with and can remember easily, however in the interests of YOUR account security, do not use things like your real name, dog's name, or something that someone that knows you might guess. Try to use at least 6 to 8 characters and throw a number and an upper case letter in there. |
|
|
Confirm Password: Well this is just what it says. we want the entry of your password confirmed so you don't forget it. (Remember these are case sensitive). |
|
|
Remember Password: If you do not want to remember your password each time you enter myJabber Click this button. But it also allows others to enter your myJabber account from your desk or office without a password. |
|
|
Profile Name: this will set itself to your username by default, but can be changed if you wish. |
Click
![]() to continue.
to continue.
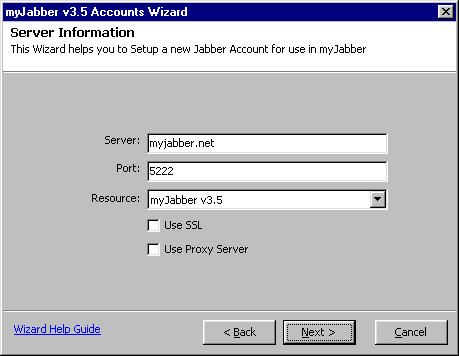
Figure 3 ServerInformationScreen
|
|
Server: Defaults to myjabber.net, but can be changed to whatever server you wish to use. Note: In some proprietary clients versions, this option does NOT appear, as they only work with ONE server. |
|
|
Port: This is the port through which you will communicate with the myJabber server. This port is defaults to 5222 on most servers, but could be changed to anything the server administrator likes. |
|
|
Resource: This option, defaults to myJabber but can be changed to identify your location (such as home or office). This field must contain something. |
|
|
Use SSL: A check in this box will tell myjabber to use the Secure Socket Layers protocol that provides added security to your connection. Please see the following Note on this. Checking the Box will also automatically change the port to 5223. Note: This will only work if the server supports Secure Socket Layers. Click here for more Details on Secure Socket Layers. |
|
|
To setup your own Proxy server, you most
likely don't need to be reading this...
|
Click
![]() to continue.
to continue.
At this point the wizard is going to log onto the myjabber server and create your new account. The results will be displayed in the next screen shown in Figure 4.
Figure 4 Registered user Screen
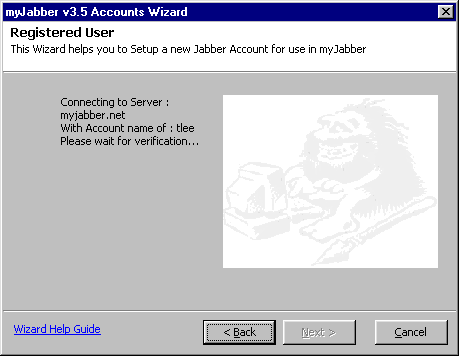
![]() The "Registered User" screen: is the result of a successful log in. Information displayed in the left side of the box shows the new account connected and was verified. It now presents you with the options to start adding your transports. If you are in a "closed" LAN environment, where you only need to use the myJabber protocol, you're finished at this point. Click
The "Registered User" screen: is the result of a successful log in. Information displayed in the left side of the box shows the new account connected and was verified. It now presents you with the options to start adding your transports. If you are in a "closed" LAN environment, where you only need to use the myJabber protocol, you're finished at this point. Click
![]() .
.
If you wish to add the transports
Click
![]() to continue.
to continue.
Figure 5 Send information to the myJabber User Directory

![]() The User Directory:. This feature allows you to enter personal information about yourself and become "searchable" to other members of our community and is stored on the myjabber.net server. The Information requested is self explanatory, so fill it in and click
The User Directory:. This feature allows you to enter personal information about yourself and become "searchable" to other members of our community and is stored on the myjabber.net server. The Information requested is self explanatory, so fill it in and click
![]() . The dialog will return a Registration Complete notice when it is finished and your data is added to the User Directory.
. The dialog will return a Registration Complete notice when it is finished and your data is added to the User Directory.
When this is done, Click
![]() to
continue.
to
continue.
This will take you to the
Gateway/Transport setups, remember if you don't use one or more of these Gateways/Transport, you need only click
![]() to skip it and move on to the next. Gateway/Transport setups are very important to get the full use of myjabber, because it is used to bring all other chat programs together so you will run one chat program at once not 3-4 programs.
to skip it and move on to the next. Gateway/Transport setups are very important to get the full use of myjabber, because it is used to bring all other chat programs together so you will run one chat program at once not 3-4 programs.
Note: MyJabber has no control over the accessibility to any of the following instant messengers.
Sales Pitch: If you are using myJabber and your friends are not, why not have them try myJabber. If you tell two people who tell two people myJabber will not only be the best Instant Messenger but it will also be the most used Instant Messenger and then maybe at some point you will not need the Transports/Gateways.
Click
![]() to continue.
to continue.
Figure 6 AIM setup screen

![]() The AIM Setup: window. Simple enough, Add your AIM screen Name and Password and click
The AIM Setup: window. Simple enough, Add your AIM screen Name and Password and click
![]() , The screen will come back with a completed notification if all went as planned. You must have all of your account info to activate this AIM Transport.
, The screen will come back with a completed notification if all went as planned. You must have all of your account info to activate this AIM Transport.
Click
![]() to continue.
to continue.
Figure 7 The ICQ setup Screen
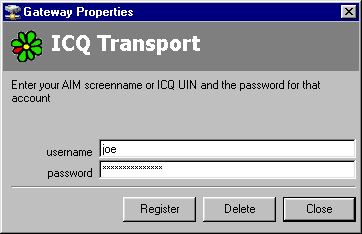
Click
![]() to continue.
to continue.
Figure 8 The Yahoo Gateway setup Screen
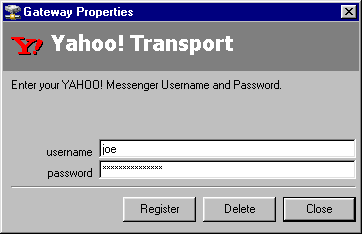
Click
![]() to continue.
to continue.
Figure 9 The MSN Gateway setup Screen
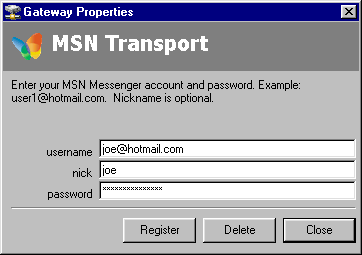
![]() The MSN Gateway/Transport Setup. enter username, password and the Nickname you use in the MSN network, You must have all of your account info to activate this MSN setup, click
The MSN Gateway/Transport Setup. enter username, password and the Nickname you use in the MSN network, You must have all of your account info to activate this MSN setup, click
![]() , when the complete returns,
, when the complete returns,
Click
![]() to continue.
to continue.
Figure 10. The Wizard completion Screen
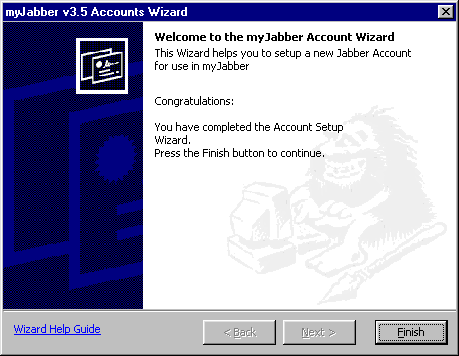
![]() This is the final screen in the Account Setup Wizard .You can click
This is the final screen in the Account Setup Wizard .You can click
![]() to go to a step to redo.
to go to a step to redo.
Click
![]() to exit the wizard
to exit the wizard
Restart the client's connection to the server
![]() This is the final step.... , disconnect from the server and then Re-Connect,
this is used to use your configured Gateway/Transport.
This is the final step.... , disconnect from the server and then Re-Connect,
this is used to use your configured Gateway/Transport.
You MUST disconnect and reconnect to have all of your new data saved and go into effect.Good luck and enjoy myJabber!!
